This is a cake you can really put your heart into.
I wanted to do something cool for Valentine's Day like the 4th of July cake.
So I did a google search and found this cake from the blog I AM BAKER.
But I figured there must be a way to adapt it so the heart is on every slice, not just in the entire cake.
Wanna know how I did it?
Trust me, it's super easy.
 Step 1. Make FOUR 8-inch or 9-inch round cakes. I used two boxes of white cake mix for this.
Step 2. When these cakes are cool, put them in the freezer for a few hours or overnight.
 Step 3. Make a pan of red velvet cake. This does not need to be any shape or size.
I wanted to do something cool for Valentine's Day like the 4th of July cake.
So I did a google search and found this cake from the blog I AM BAKER.
But I figured there must be a way to adapt it so the heart is on every slice, not just in the entire cake.
Wanna know how I did it?
Trust me, it's super easy.
What you need:
1. Three boxes of cake mix. Two white and one red velvet. (If you live in the Canada and can't find red velvet cake mix, just use a white cake mix and add a TON of red food coloring.) You also need any ingredients the cake mixes call for.
2. Three store-bought tubs of icing. Yes I said three.
3. 8-inch or 9-inch round cake pans.
4. A metal heart-shaped cookie cutter. Plastic cookie cutters will NOT work.
Plus any other baking gadgets you like (i.e. cake leveler, bake-even strips, etc.)
 Step 1. Make FOUR 8-inch or 9-inch round cakes. I used two boxes of white cake mix for this.
Step 2. When these cakes are cool, put them in the freezer for a few hours or overnight.
 Step 3. Make a pan of red velvet cake. This does not need to be any shape or size.
 Step 4. Use a fork to break up the red velvet cake. Add one tub of icing and mix it in. It should look like the picture above. Cover and put this mixture in the fridge for later.
 Step 5. Layer your cakes on two plates with icing in the middle.
 Tip: If you put saran wrap on the plates you can label one "top" and the other "bottom".
 Step 6. Put a toothpick in the middle of one of the cakes. Put a second toothpick in the cake about a half-inch away from the edge. With floss or string, tie the toothpicks together. Hold the middle toothpick steady and drag the second one around the cake, making a circle indent all the way around. Using the same toothpicks, repeat this on the second cake.
 Step 7. Draw a line with permanent marker in the center of your cookie cutter. Stick the cookie cutter right side up in the "bottom" cake so it barely covers the line. Using the circle indent as your guide, drag your cookie cutter around the cake until you complete your circle. (The shape will be much better if your cake is frozen at this point.) Remove the loose cake.
 Step 8. For the "top" cake, turn your cookie cutter upside down and carve out cake the same way as in step 7. Remove the loose cake.
 Your bottom cake should look like this.
 Your top cake should look like this.
(I know, I know. They kinda look the same in these pictures, but trust me, they're different.)
 Step 9. Crumble your red velvet mixture into the holes. Be delicate when putting it in at first. Once you have them filled, you can pat them down a little. Put your cake back in the fridge or freezer for at least 15 minutes to let the cake set. Your cakes should look identical at this point. This is why it's important to label each plate.
Step 10. Ice the edge of the white cake and the middle part. Do not ice anything red!
Step 11. Flip the "top" cake onto the bottom cake. The easiest way to do this is just to use your hands.
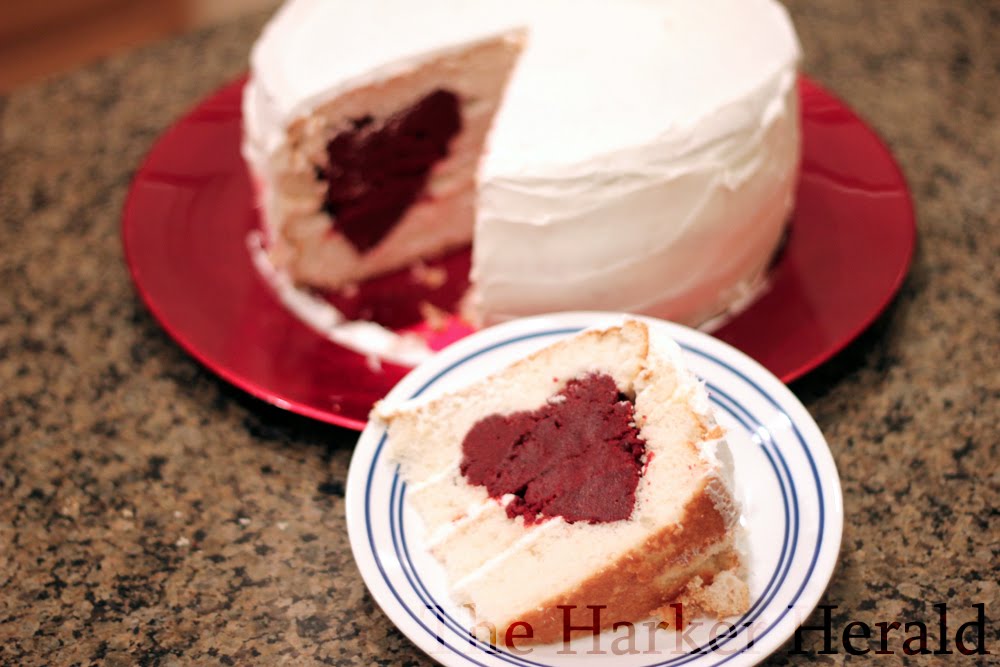
 Step 12. Use the rest of your icing to cover the entire cake. I like to make it look really plain so people will be EXTRA surprised when you cut into it.
Congratulations! You're done!!


When I gave my hubby a piece of cake, he said "Wow, this tastes really good."
Seriously?
Like I care how it tastes!!!
I am VERY impressed!! and it looks super yummy!
ReplyDeleteIs there anything you don't do! Way cool! You may want to tell Darrin you made a compass with the tooth pics and floss and not a protractor. ;)
ReplyDeleteGarn
awalkwithourangel.blogspot.com
That's a real 'sweetheart' of a cake. :) Better copyright the idea now, it should be easy for somebody to make cake pans that will have the cutout already in it to make it easier.
ReplyDeletePretty Awesome Lesli!
ReplyDeleteI can make a vertical layer cake. It's pretty awesome too.
I came across the CD you made me and it did make me remember all the good things that summer, featuring you!
Oh and I love the bit at the end of the post! I made some Christmas cookies like that. Gave them to my friend to be looked at and enjoyed for a while, then savored. Imagine my dismay when they were devoured two minutes later by her husband and son. Chunks of cookie flying every where and littering the floor (literally). She didn't even make it out of the church with them!
ReplyDeleteI loved watching your segment on Studio 5 making this cake!...But, I do have to ask...have you baked with the Wilton Heart Tasty-Fill Cake Pan Set? Your method was brilliant. But this cake pan (for which I've had for over a yr) does the same thing but much, much, much easier. Give it a try if you haven't already. The heart comes together nicely, as well! :)
ReplyDelete