Showing posts with label Tutorials. Show all posts

Thursday, November 22, 2012

Thanksgiving "Corn" Marshmallow Treats

This past weekend the hubby and I had the great privilege of babysitting my niece and two nephews while their parents were out of town.

I was in charge of coming up with an amazing activity to keep them occupied, and since I work for Studio 5 now, that was pretty easy.


The idea for the "corn" marshmallow treats comes straight from a Studio 5 segment you can watch here.  This was just one of 10 ideas for edible Thanksgiving favors.

Here's what you need:
Kix Cereal
Marshmallows
Butter
M&Ms
Corn Husks (found in the Mexican food aisle at the grocery store)
Popsicle Sticks (or another candy stick)
Twist Ties (or you can tear pieces of the corn husks and use those as ties)

Use your favorite Rice Krispie Treats recipe (I used the one on the Kellogg's website and doubled it) and replace the Rice Krispies with Kix. Above, my niece Gemma is helping me pour the cereal into my giant stainless steel bowl from IKEA.  The boys were too busy playing with G.I. Joes to help right away, but that didn't last long.

Sanitation was not the number one priority in this project.  Here's Gemma eating a few Kix right out of the bowl.  A theme you'll continue to see throughout this post.


While I was getting the rest of the supplies ready, Gemma got to work on probably the best part of the project.  Separating the M&M colors.  You only want to use orange, brown, red, and yellow M&Ms.  All the rest are up for eating.  That's when my nephew Sawyer decided he wanted to be part of out little activity too.

Sidenote: Yes, I put makeup on my niece.  It's the glitter eyeshadow from Eye Kandy, and it's AMAZING!  I'm currently obsessed.


Here's Gemma helping me melt the marshmallows and butter.  She ate the marshmallows, I stirred the mixture.  Again, not very sanitary.

One lesson I learned in all this: don't use big marshmallows for Rice Krispie Treats.  They take FOREVER to melt.

One thing I love about Gemma is how excited she gets about EVERYTHING!  For example, her reflection in my big pot.  We couldn't move forward with our treat until we made a million funny faces!

Then it was time to add the marshmallow to the Kix.  This was when Milo finally decided to join us.

I tried to wait a while before adding the M&Ms, but I probably didn't wait long enough.  They got a bit soft while we were molding the treats.

Speaking of which, molding the treats is the next step.


Make sure you have the popsicle sticks ready, plus you want to start soaking the cork husks.  They need to sit in water for a few minutes so you can mold them.

Then it's time to get messy!!

Mold the marshmallow treats into the shape of corn on the cob. Leave out at least an inch of the stick.
Place the finished treat on the corn husk and use the twist tie to secure it to the popsicle stick.
That's it!  You're done.  Pretty easy, eh?

We were all very proud of our work!

Milo shows off the chewy goodness.

Sawyer was so funny.  He was so proud of his corn, he held it like a new baby!

Here are the finished masterpieces!


Monday, February 13, 2012

The Star Wars Party for Adults!

If you know Tom, you know he's a Star Wars nerd.
Not the trivia-quoting kind, but the kind who names his dog "Yoda", cuz it's cool.

But a few weeks ago one of our nephews called him out because he doesn't actually own ANY of the Star Wars movies.
That is, until yesterday.
Tom asked for all the Star Wars Blu-rays for his birthday.
But I couldn't just give him the movies, I had to give him the whole Star Wars experience.


It started at breakfast with Star Wars pancakes with our nephews!
The pancakes molds (from Williams-Sonoma) was one of Tom's birthday presents.


Then it was time to get started on the cake for Tom's Star Wars birthday party.


I started with six round cakes (three box cakes with a few secret ingredients.)
I found a copycat recipe for the cream cheese cake filling Costco uses.
It is so ridiculously good, it was probably my favorite part of the cake.
You can find the recipe here (I used white chocolate pudding mix instead of vanilla.) 


Then I started trimming.  Can you tell yet who I was trying to sculpt?
  

Then, I iced the head and used a color spray to make it grey.  (It was actually black color mist, but it turned out looking grey, which is what I was hoping for.)


Then I iced the rest of the body with white icing.


After a few blue and black accents... Voila!  Tom's R2D2 cake!

Time to party!


That's me and Tom as a Storm Trooper and Darth Vader.


Ash and Aaron came as people from the planet Hoth.


I don't need to tell you who they are, right?


This is Tom's friend Dan.  He's probably the biggest Star Wars nerd on the planet.  Having him there totally MADE the party! (He knew the answers to all the Star Wars trivia when no one else had a clue.)


We played Star Wars charades.  Here Ashley is pretending to be Jabba the Hut.  Her team got it in seconds!
We also played Star Wars Trivia with questions from this website.
I learned a ton of interesting (and useless) facts about Star Wars.
Like, did you know George Lucas considered making Luke Skywalker a midget?
We also played a game with Star Wars movie quotes, where people had to guess who said the line (but I can't find the website it came from right now.)


Here's Tom blowing out his candle.


Ashley as Darth Vader.


My other friend Ashley as a Storm Trooper.


And here's Tom again.  My sexy birthday boy!
Happy Birthday baby!  You may be OLD, but you're obviously still 14 at heart.
That makes me a hot cougar right?  RIGHT?

Tuesday, February 1, 2011

The Heart Cake on Studio 5


Yesterday I did my first real segment on Studio 5.
I was soooooo nervous, but everyone on the show was so nice and helpful!
Check it out!
(The original blog post is here. The heart cake on my blog actually looks better than the heart cake on the show.)

Please don't make fun of how many times I say "I know, right?" like a valley girl.

Please do make note of how awesome my nails look. Thanks to Ashley for the awesome french manicure!!
And thanks to Annie for teaching me how to curl my hair properly!

A few people have asked about my apron.
It's from Anthropologie.

Also, don't forget the purse giveaway closes Feb. 5th.
Enter here.

Thursday, January 27, 2011

Heart Cake


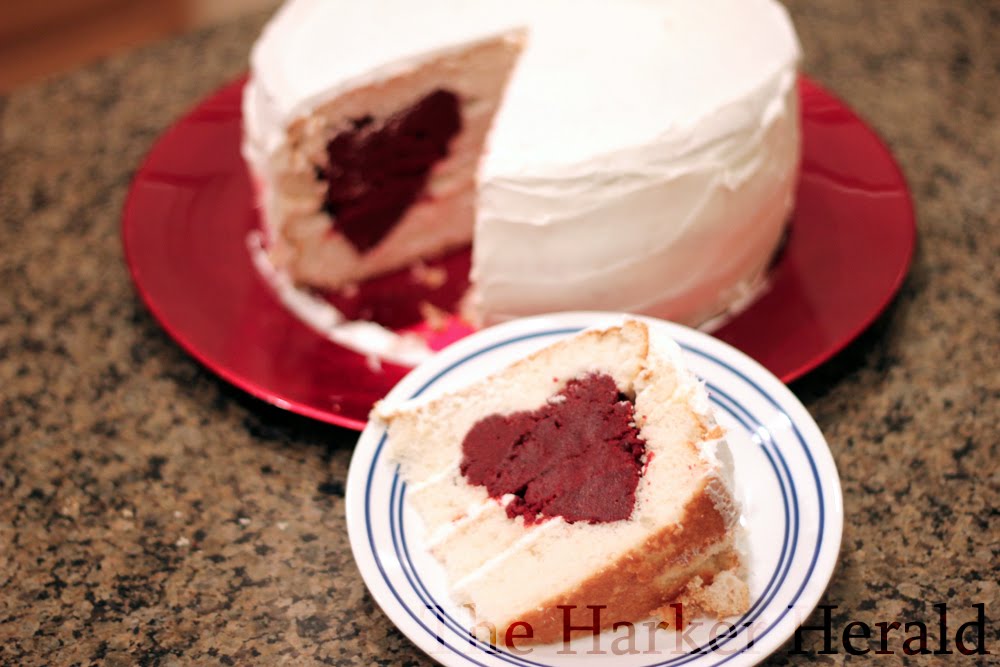
This is a cake you can really put your heart into.

I wanted to do something cool for Valentine's Day like the 4th of July cake.

So I did a google search and found this cake from the blog I AM BAKER.
But I figured there must be a way to adapt it so the heart is on every slice, not just in the entire cake.

Wanna know how I did it?
Trust me, it's super easy.

What you need:
1. Three boxes of cake mix. Two white and one red velvet. (If you live in the Canada and can't find red velvet cake mix, just use a white cake mix and add a TON of red food coloring.) You also need any ingredients the cake mixes call for.
2. Three store-bought tubs of icing. Yes I said three.
3. 8-inch or 9-inch round cake pans.
4. A metal heart-shaped cookie cutter. Plastic cookie cutters will NOT work.
Plus any other baking gadgets you like (i.e. cake leveler, bake-even strips, etc.)


Step 1. Make FOUR 8-inch or 9-inch round cakes. I used two boxes of white cake mix for this.

Step 2. When these cakes are cool, put them in the freezer for a few hours or overnight.

Step 3. Make a pan of red velvet cake. This does not need to be any shape or size.

Step 4. Use a fork to break up the red velvet cake. Add one tub of icing and mix it in. It should look like the picture above. Cover and put this mixture in the fridge for later.

Step 5. Layer your cakes on two plates with icing in the middle.

Tip: If you put saran wrap on the plates you can label one "top" and the other "bottom".

Step 6. Put a toothpick in the middle of one of the cakes. Put a second toothpick in the cake about a half-inch away from the edge. With floss or string, tie the toothpicks together. Hold the middle toothpick steady and drag the second one around the cake, making a circle indent all the way around. Using the same toothpicks, repeat this on the second cake.

Step 7. Draw a line with permanent marker in the center of your cookie cutter. Stick the cookie cutter right side up in the "bottom" cake so it barely covers the line. Using the circle indent as your guide, drag your cookie cutter around the cake until you complete your circle. (The shape will be much better if your cake is frozen at this point.) Remove the loose cake.

Step 8. For the "top" cake, turn your cookie cutter upside down and carve out cake the same way as in step 7. Remove the loose cake.

Your bottom cake should look like this.

Your top cake should look like this.
(I know, I know. They kinda look the same in these pictures, but trust me, they're different.)

Step 9. Crumble your red velvet mixture into the holes. Be delicate when putting it in at first. Once you have them filled, you can pat them down a little. Put your cake back in the fridge or freezer for at least 15 minutes to let the cake set. Your cakes should look identical at this point. This is why it's important to label each plate.

Step 10.
Ice the edge of the white cake and the middle part. Do not ice anything red!

Step 11. Flip the "top" cake onto the bottom cake. The easiest way to do this is just to use your hands.

Step 12. Use the rest of your icing to cover the entire cake. I like to make it look really plain so people will be EXTRA surprised when you cut into it.
Congratulations! You're done!!


When I gave my hubby a piece of cake, he said "Wow, this tastes really good."
Seriously?
Like I care how it tastes!!!